Serverlessnet
Serverlessnet is an emulator for rapid prototyping of serverless IoT network for experimental purposes. Virtual topologies of IoT devices are created and connected through a serverless framework, and can be controlled through an intuitive UI. Custom lambda functions can be executed through a connection to an OpenWhisk instance. This system can easily be used to test the fault tolerance of an IoT network as well.
Why Serverlessnet?
Serverless frameworks are the natural way to run LAN outside the cloud. As IoT devices often have limited computational power, serverless frameworks offer the capability to offload CPU to more powerful remote networks, in this case, the instance of OpenWhisk. Running this network outside the cloud allows for more robust IoT systems that can deal with network outages. There are multiple ways of achieving this; however, having this system be serverless provides a higher level of abstraction for the developer, as functions can be written without knowledge of system processes and frameworks.
Internal Workings
Containernet
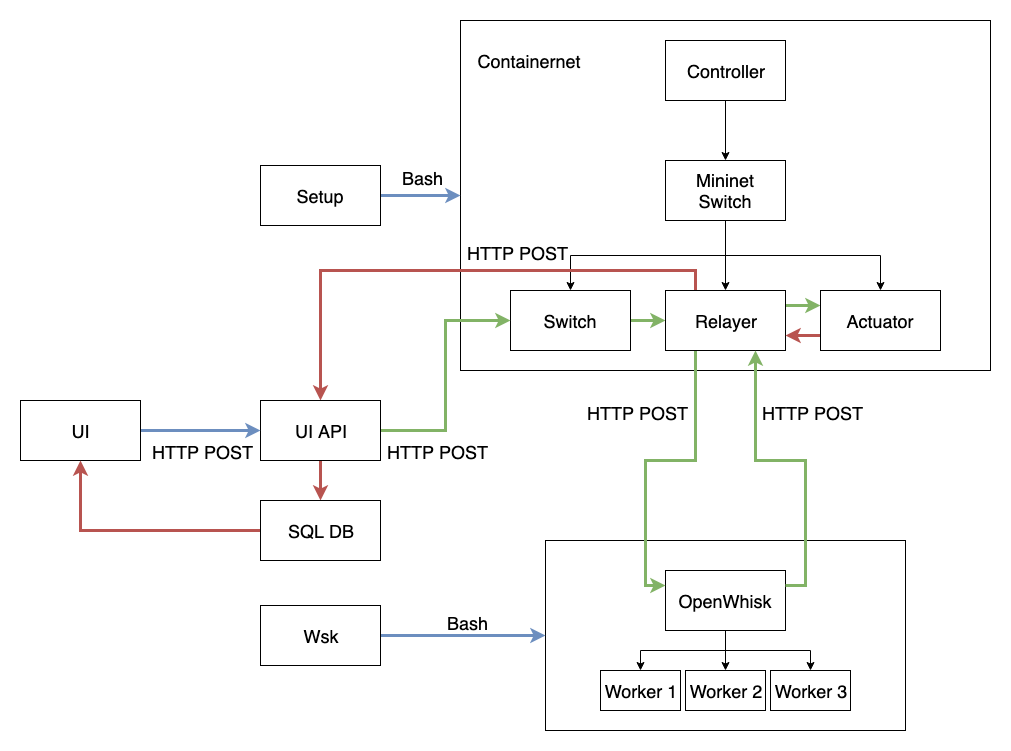
Containernet, which is a fork from Mininet consists of three major types of nodes: controller, switch, and host. Containernet is engineered to support running docker containers as hosts in a topology. In Serverlessnet, the topology typically includes a controller and a switch which connects any number of buttons, actuators, and one relayer, each of which packaged in a docker container. These buttons act as the “on and off switches” for the actuators, and the relayer uses the information from the buttons to trigger OpenWhisk tasks, the results of which will be sent to the actuators. The actuators will then send their updated states to the UI API, as will be discussed below.
OpenWhisk
The OpenWhisk module consists of several workers executing custom lambda functions. This module does the heavy computing for the switches and actuators.
The Relayer Architecture
One of the main issues of OpenWhisk is that it is not containerizable. OpenWhisk consists of many containers, and having nested Docker containers is not ideal. OpenWhisk is also extremely hard to scale due to the multitude of containers. Therefore, we decided to create one instance of OpenWhisk running separately from our general architecture, which will be accessed only through our relayer. A side effect to this is that the computing instance can be modularized, and this instance of OpenWhisk can be replaced with any other computing instances.
UI
The UI is a Flask application run on the local machine. This UI provides visualizations of simple switches and actuators (denoted by circles), and updates the actuators accordingly when its corresponding switch is pressed. When the switch is pressed, a post request, with the port number of the switch, is sent to the UI API. The UI also polls the SQL DB every second to receive information on how to change the actuator, for example, turning it from red to black depending on its current state.
UI API
The UI API is a containerized Flask application that acts as the communicator between the UI, Containernet, and SQL DB. This API receives the state information from the actuators, and sends a post request to the SQL DB to update the state in the table. When the UI API receives a post request from the UI, it will forward the information to Containernet for processing.
SQL DB
The SQL Database is a containerized Flask application whose purpose is to access and update the database file that was initialized with its Docker container.
High-Level Setup
First, we clear all existing actions that OpenWhisk may be running at that time. Then, we choose any of our custom actions for OpenWhisk to run. Next, we run a setup script to initialize Containernet. This allows us to use docker containers as hosts in the topology. Then, we initialize any number of buttons and actuators with a program. These button and actuator connections will be written to a json file, which will be fetched by both the database and the UI in their initializations. Last, we create the Docker containers for the database and UI API with their respective Dockerfiles, and launch the UI on our local machine.
Issues Encountered
We decided to use Containernet instead of Mininet because Containernet provides us with the capability of using Docker containers as hosts in the emulated network. We have also decided to use OpenWhisk instead of OpenLambda. This is because OpenLambda does not seem to be in active development, and OpenWhisk is the industry standard. We also ran into installation issues for OpenWhisk on Debian, thus we have a native installation on Ubuntu.
Limitations
Even as this system is highly scalable, it is limited by the memory on the network servicing Containernet. Therefore, it is possible for instance, to use this in an experimental setting for a school campus network emulation, but difficult or near impossible for a whole city’s network. OpenWhisk provides functionalities to allow different machines to handle the load of the workers, or run on a separate machine entirely, which can reduce the load.
Future Work
We hope others can adopt this system to create custom IoT network initializations, as in the real world, devices can act both as senders and actuators. In addition, we want to support a variety of message types including fanout, topics, headers, and others one can find in a message broker. We also hope that the containers acting as the buttons and actuators can be customized as actual device emulators. Theoretically, multiple relayers can also be introduced into the system, which would control various computing instances used by different buttons and actuators. The OpenWhisk component can be replaced with different computational networks, so exploring that realm is also a possibility.
Installation
Prerequisites
This program will be run on two separate machines, a remote machine for spinning up topologies and managing the workload of OpenWhisk and a local machine to interact with the UI.
On Remote Machine:
-
Ubuntu 16.04+ (all other versions untested)
-
OpenWhisk Docker compose is the recommended implementation.
-
- For any issues with the authentication key, use the key presented in this file
-
(Recommended, optional) Tmux Nested Docker deployment is the recommended implementation.
Installing
Clone the repository to your local and remote machines
git clone https://github.com/serverless-net/serverlessnet.git
Get Started
Initialize Serverlessnet
There are two steps to get Serverlessnet initialized and ready to work:
- Launch OpenWhisk
Since the docker compose implementation is recommended, you can simply do the following.
(In the base directory)
cd incubator-openwhisk-devtools/docker-compose
make run
- Launch Containernet
You can launch Containernet by simply using the following. But in order to have more flexibility, we recommend launching Containernet in a separate window using software such as tmux.
(In the base directory)
cd serverlessnet
sh setup.sh
Now you are inside Containernet. If you have tmux installed, you can easily navigate outside of the container and execute commands in other windows.
Serverless Function Configuration
Running functions in a serverless environment is the core feature of Serverlessnet. After OpenWhisk is up and running, it is crucial to set up the serverless function before setting up a topology. OpenWhisk supports many languages for serverless functions. In the button-switch demo, we provide a function flip_switch written in node.js. You can find the file under openwhisk_actions/flip_switch.js.
To create the flip_switch action, run the following code. You can create any serverless function in the same way.
(In the serverlessnet project root directory)
cd openwhisk_actions
wsk -i action create flip_switch flip_switch.js
Start a topology
Now we are ready to launch a topology! If you are outside of the Containernet instance, you can now switch back in.
Topology files are written in python, which specify how a network of docker containers should be deployed and linked. You can find a good example here. For the following instruction, we are going to launch a topology with 3 pairs of buttons and actuators. We provide a single.py topology for your reference.
(Inside the Containernet instance and in /containernet directory)
cd serverlessnet/topology
python single.py 3
Interact with Serverlessnet in UI
To enable external UI, we need to fire up the api on the remote machine, which builds and runs the Docker containers for database and UI API
(In the base directory)
sh shell/run_api.sh
On the local machine:
Run UI
python3 iot_python_script_webapp.py
You should see some buttons and actuators on the screen, the former controlling the latter.
Contact
If you encounter any issue regarding the project, feel free to open a ticket in the repository or contact the lead developers.
License
This project is licensed under the MIT License.
Acknowledgments
This project is incubated in the Internet Real-Time Lab at Columbia University, under the mentorship of
- Jan Janak
- Pekka Karhula